Building the UI, part 1 - Receiving Inputs
Happy Monday, everyone. Quick reminder that if you're just joining us, we're a week into a coding exercise building a simple application that models an everyday object. You can catch up over here.
Another reminder: The purpose of this exercise is to understand how to build modular applications and identify the boundaries around which you can allocate responsibilities in your app. This is not a tutorial on how to build production applications. In other words, you probably don't want to use this as a portfolio project. This is a massively over-engineered toy project.
And now, onward...
Collecting User Inputs
In the last step, I gave you a basic mockup of an HTML form we could use to collect our inputs. Here's a slightly revised version.
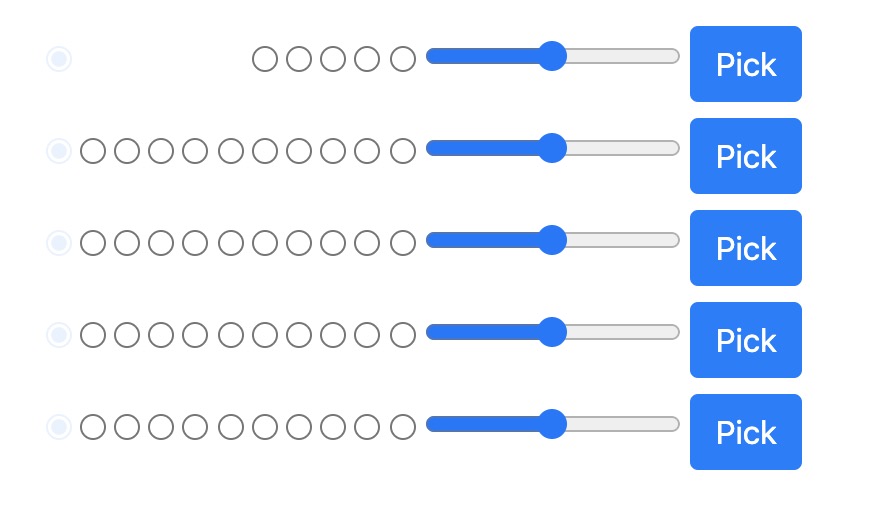
For ease of programming, the open state of our strings are represented by the faded radio buttons on the left, and I've removed frets 1 through 5 on the top string, consistent with the banjo's shortened string at index 4. (remember, our strings are zero-indexed as part of an array)
Here's the HTML for this form.
I advised in the last email to keep your UI event handlers thin, and pass information onward to business logic as quickly as possible. With our existing banjo implementation, that becomes pretty straightforward.
I'll start by simply instantiating the banjo and attaching an event handler to the "Pick" buttons:
(code formatting is better on the web)
// File: ui.js

const banjo = new Banjo()
const pickButtons = document.querySelectorAll("button.pick")
const handlePick = (evt) => {
  // extract the data-string attribute and parse it to a number
  const stringIndex = +evt.target.dataset.string

  // this is the document selector for the corresponding strength input
  const selector = `input[name='strength-${stringIndex}']`

  // get the value of the strenth input and parse to a number
  const strength = +document.querySelector(selector).value

  // Keep those UI handlers thin!
  banjo.pickString(stringIndex, strength)
}
pickButtons.forEach(pick => pick.addEventListener('click', handlePick))
The event handler does three things. First, it pulls the string index out of the data-string attribute of the pick button. Using that string index, it gets the value of the corresponding strength slider, then it passes both of those arguments to the banjo object.
We can add a similar handler to the frets:
const frets = document.querySelectorAll("input.fret")
const handleFret = (evt) => {
  const stringIndex = +evt.target.dataset.string
  const fret = +evt.target.value
  banjo.fretString(stringIndex, fret)
}
frets.forEach(fret => fret.addEventListener('change', handleFret))
For simplicity I'm attaching individual event handlers to each input. In a real app you might consider delegating the event handling to a DOM element higher up in the tree. I'll leave that performance optimization as an exercise to the user.
But wait! How do we test our code? I mean, other than the unit tests that you've been writing all along. You have been writing unit tests, haven't you?
But seriously, there's no observable output yet. I hinted in my last email that we should turn the Banjo class into an event emitter, and that's what we'll do.
// File: banjo.js

// extend the EventTarget class
class Banjo extends EventTarget {

  // rest of class is unchanged...

  pickString(stringIndex, strength) {
    try {
      const tone = this.strings[stringIndex].pick(strength)

      // emit a tone event when we pick the string. We can attach arbitrary
      // information, in this case our tone object, to the detail property
      this.dispatchEvent(new CustomEvent('tone', { detail: tone }))

      return {
        ...tone,
        stringIndex,
        volume: this.muted ? tone.volume / 2 : tone.volume
      }
    } catch (err) {
      console.warn(err.message)
      return null
    }
  }

}
With these two small changes, the banjo now emits a tone event each time we pick the string. We can listen on that event right now for debugging purposes as we're building our UI inputs, and tomorrow, we'll use it in the final step to actually produce sound.
// File: ui.js

banjo.addEventListener('tone', tone => {
  // the `tone` object that we emitted from the banjo lives on the
  // detail property
  console.log(tone.detail)
})
Now we can verify on the console as we pick and fret in the UI that we are seeing the expected results.
Here's the whole thing so far.
Tomorrow, we'll finish up by adding sound.
Next Up:
Wrapping up: Adding Sound to our Banjo
Previously:
Building a UI for the Banjo